Are you tired of the soft bags that came with your Heritage, or do you want to add fiberglass bags to your Softail? If yes, keep reading. Think it'll cost a mint (like everything else you want to do to your scooter)? Nope - wrong. Are you under the impression that you must be a master fabricator to do so? Bzzzzzzt! No, but thanks for playing our game. All you have to do is follow these steps and you too can have a set of factory (OEM) glass bags on your Softail.
In providing these instructions, I assume you're exhaust system is either stock for a FLSTC, or is some sort of dual exhaust system (like the H-D factory dual exhaust who's pipes run down both sides of the bike below the height of the rear wheel axle. If you're running exhaust similar to a FatBoy (FLSTF) or Heritage Nostalgia (FLSTN), you must change the exhaust before starting on this project because the pipes travers the area used by the right-side saddlebag.
If you're installing onto any Softail other than a Heritage (FLSTC), you may have to make further modifications to your bike to accomodate the hard bags, such as rear turn signal relocation, exhaust modification (or replacement), etc. Bikes that most likely will require the extra modifications described above are FLSTF, FLSTN, FXSTC, and FXSTS.
I assume that your bags are already painted and assembled (clips, latches, locks, etc).
I assume that the bags you are trying to install are from an EARLY FLH (up to and including 1978). A place called V-Twin sells bags that look like these, but I recommend AGAINST buying those bags. They're junk. I am basing this claim on having actually seen a set and they were COMPLETELY unacceptable because they are made of abs plastic, they were severly warped, and they're smaller than the OEM bags that they're meant to replace.
All measurements given in these instructions work on MY bike. I cannot guarantee the same results for your bike due to differences in brands of rear crash bars, position of side-mounted tool-boxes, position of rear turn signals, etc.
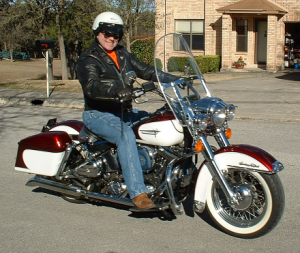
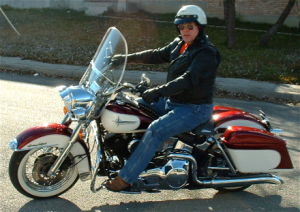
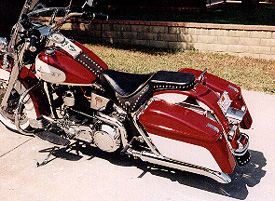
I can't guarantee your bike will end up looking as good as mine (see Spictures on right - grin).
Lastly, you are performing this modification of your own free will. I will not be held responsible, financially or otherwise, for any property damage or personal injury that is caused while implementing, or as a direct result of implementing the modifications shown below. In other words, if you fuck up your bike or your tools, or if you injure yourself or anyone else, don't come crying to me. I'll be sympathetic - hell, I may even shed a tear (depending on the severity of the damage done to the bike), but that's where my involvement will end.
Unfortunately, this project requires the use of "tools". If that wasn't enough of a surprise for you, you also need some parts. Here's the list:
Required parts:
- The saddlebags in question, along with the mounting brackets and stabilizer rod. These came in the saddlebag kit from H-D.
- Four bolts/nyloc nuts, and 16 flat washers. The bolts should be the same size as the stock mounting plate bolts, and will be used to mount the stock H-D brackets to our aluminum adapter plates.
- Two pieces of T6 aluminum plate (1/8-inch thick) cut in 4-inch by 11-inch pieces.
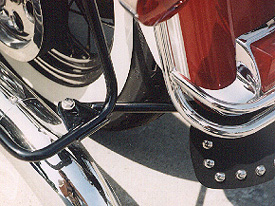
- If you have rear crash bars, you may also have to purchase a shorter rear turn signal bar.
- Two bolts, four flat washers, and two nyloc nuts (for the stabilizer rod).
Required tools:
- 1/2-inch combination box/open-end wrench
- 3/8 drive ratchet
- 3/8 drive short extension
- Phillips screwdriver
- Jig saw (if you plan on cutting the aluminum plates yourself)
- Jigsaw blades suitable for cutting 1/8-inch aluminum
- Electric drill motor
- 3/8-inch drill bit (suitable for drilling aluminum)
Remove the old bags and mounting brackets.
If you're not removing stock Heritage bags, you may have to purchase four mounting studs (H-D p/n 90361-90) in order to continue. Believe me when I say this will make mounting and bags a little easier.
Retain the bolts which mounted the original brackets to the frame rails.
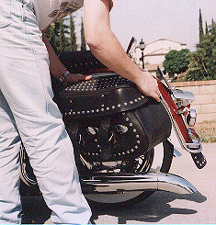
Manufacture the adapter plates.
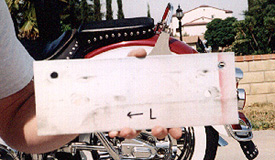
Obtain a 4-inch x 22-inch piece of 1/8" thick T6 aluminum and cut from it (or have it cut into) two pieces of equal size. The plates in this picture were cut to 4"x11". You can also use steel but then you'd almost HAVE to have someone else cut it for you.
Drill four 3/8" holes in each adapter plate.
- Front/top hole: 3/4" from top, and 3/4" from front edge
- Rear/top hole: 3/4" from top, and 1" from back edge
- Front/bottom hole: 2-1/4" from top edge, and 1-5/8" from front edge
- Rear/bottom hole: 2-1/4" from top edge, and 2-1/4" from rear edge
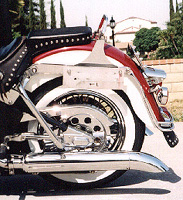
Mount the adpater plates to the frame mounting points. Make sure you put the front edge of the adapter plate towards the front of your bike.
Mount the stock H-D brackets for the fiberglass bags to the adapter plates.
Snug up but do NOT fully tighten the bolts at this time. Slide the bracket as far back towards the rear of the bike as possible.
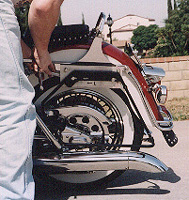
Mount the bags onto the brackets.
Check the clearance with the turn signals on the rear fender. There should be about 1/4" of air between the bag and the turn signal assembly. Remove the bags and tighten all bolts.
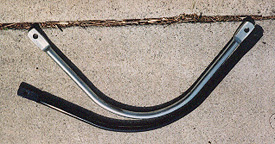
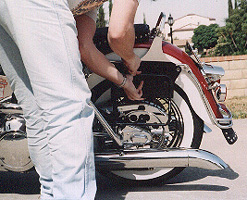
Lengthen the stabilizer rod.
As shipped from H-D, the stabilizer rod that joins the back of the brackets is approximately 2-1/8" too short. I recommend taking carefull measurements, and taking the rod to a local machine shop and let them heat it up and unbend it the required amount.
The picture shows one stabilizer rod (silver) the way H-D ships it, and the otrher one (powder-coated) shows the way it looks after being straightened the required amount.
Once the stabilizer rod is long enough, attach the stabilizer rod to both brackets.
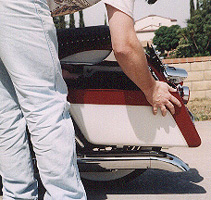
Install the bags on the brackets, add the tops, and voila! You're done!